Showing posts with label gardening. Show all posts

Monday, October 22, 2012

Concrete Planters

How 'bout a post that has nothing to do with the baby?  Well, maybe a little to do with  the baby cause she was there (and very helpful). 

We have jasmine growing up the sides of our pergola.  It is a beautiful vine and it smells heavenly when it blooms.  Simply, we love it.  However, we do not love the planters we put it in.  They are cheap, falling apart, allow no room for root growth and are simply ugly.  Don't believe me?  See for yourself...

Not so pretty...  So we set off to make some easy, awesome looking planters out of those big, concrete stepping stones you can get at any hardware or landscaping store.  We opted for the 16" squares because we wanted lots of room for the plants to grow.  Plus we only made the four sided (no bottom), so the root system could eventually work its way into  the ground.

To start, we purchased 16 squares (4 squares per planter times 4 planters)  and some landscaping adhesive.  Once we got then home, we positioned Ella to supervise (babies first project, yay!)...

And we laid out our steps...
applied some adhesive...
And added the next step...
And the next...
And the last one...
And pretty soon, we had 4 planters all set...
Two quick notes:  this stuff sets up pretty fast, but we found it was helpful to hold the steps in place for just a minute to ensure that it was stable and the adhesive we got recommended allowing 5 days before the project was used, so these babies got a few days in the garage before they were installed.

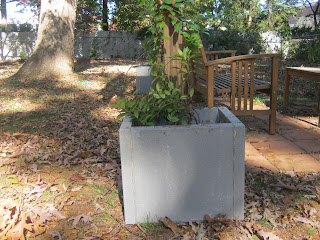
And speaking of installation, my darling husband gets all the credit here.  These suckers are crazy heavy and Ella decided she wanted to eat.  So Seth got the planters into place, removed the old planters, added new dirt, and got the plants all settled in their new home (my husband is pretty awesome).  And the results are fantastic...
The planters look slightly industrial and really complement the pergola (rather than making it look cheap)...
I am super excited about the  new planters, especially because they are so large.  I may be able to nestle in some annuals come spring time.  Anyone else do some last minute fall gardening?


Thursday, September 29, 2011

Still not the Yard of the Month

Time for some follow up...  Last time we check in on the yard, I shared our scary blank canvas and a super sweet illustration of what will come.  So how did we do?

A bit better, eh?

I know these shots don't do a lot to highlight what happened, mostly because I like to buy baby plants and let them grow into bigger plants.  Baby plants are less expensive and easier to plant since you don't have to dig a big ass hole.

So lets take another look at that sweet drawing I did...
What you can see in the above pictures is that the hydrangea has been moved and we have added two more hydrangeas, we have planted four hostas, we have plated a ton of daylilies and 3 rose plants.

And a closer look at each area...

HOSTAS
We got these beauties out at the Greensboro Shrub Nursery.  I believe that are called "fancee."  Luckily, they are fairly sun tolerant, so they should be able to handle the PM sun they will occasionally get hit with and these babies can get big.  I love big hostas.  We need to add more to fill out the area some more, but just these four make a pretty big difference.

HYDRANGEAS
The one hydrangea we already had is the endless summer variety.  Sadly, the Greensboro Shrub Nursery didn't have anymore endless summer's, so we picked out another blue/purple variety.  We'll see how this all works out when they bloom.

DAYLILIES

I ordered our daylilies from Smokeys Daylily Gardens.  We went with a mixed lot and was able to get 25 fans (or baby plants) for pretty cheap.  I am really pleased with this purchase.  The plants came fast and were in great shape.  I can't wait to see them next spring when they are in bloom.

ROSES
I knew I wanted to plant roses in this area because they can tolerate the afternoon sun.  After planting two knock out roses in the past, I was ready for something a little less easy care and a little more ROSE!  After doing some research, I mostly settled on David Austen roses.  These roses are know for their old rose charm (fantastic sent and beautiful shape), while still being disease resistant.  All roses came from Chamblee's Rose Nursery.  The roses arrived in excellent shape and best of all, they are potted, not bare root. 
The Winchester Cathedral rose is noted for its bushy appearance, old rose sent and double blooms. 
The Evelyn rose is named for Crabtree and Evelyn and mimics their awesome light rose sent.  And I love their light yellowy, pinky soft color.
This baby is actually the only non David Austen rose I purchased.  Named "sea foam," it is an earth kind rose.  Earth Kind roses have been cultivated to grow well in a variety of soil types, which reduces their need for soil amendments, fertilizers and pesticides.  Also, they have been bred for drought tolerance once established.  I am super excited to see how this one does.

And that wraps up our fall planting.  Clearly we still have loads to do, such as adding a new layer of pine needles, keeping up with the wedding and filling in the empty areas some more. But at least for now, I don't feel like our poor yard is such a barren wasteland.

Anybody else tackling some fall planting?


Tuesday, September 20, 2011

Not the Yard of the Month

Our cute little neighborhood association holds a yard of the month competition each month from April until October.  Seth and I are in no danger of winning that award.  I am slightly embarrassed to admit that our yard has only gotten worse since that post.  Really, it's not so much my fault.  This summer has been hotter than hell and dry.  That did nothing to improve our yard.  So that leaves us where we started, with a big blank scrubby looking yard...


See?  Well, really not see?  There is nothing except leaves and a scant layer of pine needles.  Sigh.

But don't disgrace- there is a vision...
Okay, so clearly this is my house and yard.  Stop laughing.  I know you're just jealous of my mad paint skills.

So lets start with what we have.  Starting left, Seth and I planted a whole bunch of lilies and glads, which are great, but they bloom for about 2 weeks and then dry up.  Sad face.  We then have 2 camellias, pretty evenly spaced in the yard.  We also have a dogwood.  We have a poor hydrangea planted on the other side of the dogwood.  Baby gets too much harsh sun.  In front of the hydrangea, we have some (8ish, 10ish) day lilies planted.

A quick note on why things are hard to grow in our yard.  Our house is oriented towards the south.  Which is a good thing, normally.  However, our nice, old, established neighborhood is full of nice old, established, massive trees.  These trees block the sun until about 3pm.  And then our yard gets full on  southern summer sun until dark.  Just imagine staying in your nice cool air conditioned house and the running outside, naked with no protection and standing in the dead heat until dark.  You ass would be fried and so are our plants.

So with that in mind, onto the planting plan...  Starting on the right this time, we are going to move the hydrangea to a more protected space.  We will then fill in that spot with some roses.  Roses are actually pretty hardy and afternoon sun helps prevent certain types of mildew.  In front of the roses, we will fill in with more day lilies.  The hydrangea will move to the fence line between the two camellias.  Two more hydrangeas will be added so that no one gets lonely.  In front of the hydrangeas, we will fill in with hostas.  I know this seems risky given our sun situation.  But, hostas can be pretty sun tolerant and because a big branch from the oak tree hangs over this area, I think they should be a-okay.  That brings us all the way to the left, which I haven't totally figured out yet.  Right now I am thinking a mixture of coneflowers...

And just to keep you in suspense, I can reveal that Seth and I have spent the last 2 weekends planting.  Check back early next week for the results.

Wednesday, April 6, 2011

While Away...

As I mentioned yesterday, Seth and I were out of town for the weekend.  Happily, we returned on Sunday to very sunny, warm weather and a few surprises....


Our tulips are blooming!!! And...
1 of our remaining camellias is literally falling over under the weight of all those beautiful blooms...

Of course, we left Ava alone with her favorite pet sitter (sister #3), but she (Ava, not sister) was in a mood when we got back...
That would be Ava getting ready to eat the beautiful centerpiece that the mother of the bride sent home with us.  Normally, yes, she does eat flowers, but I'm pretty sure this was done out of pure spite for leaving her.

Oliver and Tilly spent the weekend with my mom (who despite her protests that she isn't ready to be a grandmother, had picked out her grandmother name- mimi, prompting her to call sometimes and say "do mimi's granpuppies want to come over and play?).  Luckily, mom has two equally as nutty dogs and a good time was had by all.  Poor Oliver sure was all played out...
No Shame

Sweet tired puppy...

Tuesday, March 22, 2011

Proud Mama

Part of the joy of gardening, for me, is starting my own seeds.  There is nothing more optimistic than watching little baby green things emerge.  And that proud mama feeling just gets bigger as those little green things sprout their first true leaves, go on to support themselves, and blossom over and over again.  Its enough to bring a tear to your eye...

But really, starting seeds is super easy and it saves you a ton of money.  Especially if you have grand garden plans...


To start, get you some seeds.  Sure you can just run out to Target or your local home and garden store and get some seeds, and they'll most likely work just fine.  But if you really want to be a proud mama, you got to start with the Park Seed Catalog in December.  I spend every Christmas obsessing over which seeds to buy.  Sad life, I know.  I generally put my order in by the middle of January so I can be sure to start my seeds by mid-February.  Yes, you are behind the curve, but face it, you'll never be a good plant mother like me.


Next, find a home for your seeds.  For the past several years, I have used this...
Its cheap, easy and I've had some pretty good success with it.  To get your greenhouse ready to go, start by following the directions, which involve something like dumping a million cups of warm water of the little soil cups and letting them get puffed up.  They'll look like this when they're ready...
nice and fat and ready for some seeds
Each seed packet will tell you exactly how to plant your seeds.  Some need light to germinate, others want dark, etc.  Just follow the directions and you'll be a-okay.

I generally plant 2 seeds per pot, which can be tricky if your seeds are teensy...
But just dump in the soil, as directed...

To make sure that I know which seeds are which, once they are planted, I make a seed map for myself...
Once you have your seeds in and organized, pop the top on...
And find a safe place for your seed babies.  Mine used to go in the kitchen window, but Ava likes to knock them over.  That will break a proud mama's heart real fast.  So this year they are going in a closet with a florescent light on them...
And in just about a week or so, you'll have this...


Oh, I'm just so proud.  They're growing so fast and strong, brings a tear to my eye...

Once you get to this stage, just make sure to keep 'em moist with plenty of light and pretty soon you'll have some big, strong plants of your own to be ohhhhh and ahhhh over.

Anyone else strangely, seedling obsessed?

Wednesday, March 9, 2011

How Does Your Garden Grow? Part 3

Friends, I am sorry for all the yard/garden heavy posts, but with daffodils and bradford pears in bloom all around me, I just can't help myself.  But I promise after this post and 1 or 2 more, I will get off the gardening for a while... maybe... no promises.

More importantly, it is finally time for me to share my plans for our butterfly/ hummingbird garden.  Having done a bit of research, it seems that hummingbirds are really the most flaming of little birds.  They love red and they love gaudy.  As I do not love red or gaudy, this presented a bit of a challenge...

Already in the space, we have a butterfly bush (there used to be two, but Oliver decided that one of them looked like an awfully fun chew toy), herbs (rosemary, sage, oregano and thyme), a knockout rose bush, and agastache rupestris.  To that, we will be adding...


Bee Balm
Cosmos
Nasturtium
And...
Rose Moss
And darling sister #2 gifted us with a lovely hummingbird feeder for a our wedding, which will be displayed right in the middle of this madness.  I certainly think we have accomplished a gaudy, yet fun display and I am terribly excited to see if we actually attract any hummingbirds.

Thursday, March 3, 2011

Stinky Love: Compost

Not too many bloggers are willing to openly declare their love for compost, but I am happy to say that I sure do love me some good compost.

Some good reasons to embrace composting...
  • You'll feel good about yourself- no more guilt over throwing away banana peels, grass clipping and coffee grinds
  • You get some serious street cred with the hippie folk.  But really, green is a good thing and if you're like me and you work in a very professional office setting, you can get lots of interesting reactions when talking about your compost
  • You have somewhere to throw worms!  It seems every time it rains, tons of worms crawl onto my drive way and then miss the message that the rain ain't gonna last and end up turning into little bits of fried worm... ewwww.  Instead, I can just scoop those little buggars up and throw them in the ole compost pile
  • Your garden will thank you- adding compost will help keep your plans nice and healthy
  • There is nothing more fun than watching Seth turn the compost pile.  I'm too short to reach over the sides of our pile...

How Composting works in our house...

Our actual compost pile is located way back in the yard, so we keep a bucket outside the kitchen door.  This is so easy, as we can just toss our scraps into the pile
Yummy
So then once the bucket gets full, Seth or I carry the bucket to the back and dump it in the big pile...
Turn it over a couple times a year and before too long you'll start getting some beautiful stuff.

Do note that there are two different approaches to composting.  The hot compost method is for those super over achievers who want their compost and they want it now.  In this method, you are required to turn the compost every couple of weeks and keep it evenly wet.  This gets the internal temperature up and causes everything to breakdown really fast.  The other method is the cold method and is better for those of us who are a little more patient.  Using this method, you dump your scraps in and you leave them.  About a year later, you are good to go.

How to start composting...
  • Start by building yourself a compost pile.  Just google something along the lines of "easy compost pile plans" and you'll get a ton of hits.  Pick the one that suits you best!  If you don't have the yard space, there are plenty of counter top composters. 
  • Layer in the good stuff- technically there are all sorts of requirements about you need this much of this and that much of that, but again, that for those overachivers.  Our compost pile is mainly composed of kitchen scraps, grass clippings, fallen leaves, the occasional torn up newspaper, etc.  Just make sure to keep items such as grease, meat, fat, and dairy products out of your heap.  They will do nothing more than attract varmits and make a really nasty smelling mess.  Although, in our case, even though our pile is clear of these items, Matilda and Oliver do occasionally try and pull out baked potato skins and other gross things...  But seeing as how Matilda and Oliver are gross dogs, I hope they are the exception here.
  • Turn your pile every so often
  • Enjoy the goodness it produces and feel exceptionally good about how thrifty and green you are!

Wednesday, March 2, 2011

How Does Your Garden grow? Part 2

Window boxes!  Oh how I love window boxes, they bring a certain whimsical cottage charm to any abode.  This spring, I will be building and installing window boxes on the front of our house.  I promise a tutorial once I finally getting around to doing that...

But for now, lets focus on what will be in these darling window boxes.  I decided to try and keep them pretty simple since this is my first attempt with window boxes.

For height, we have...
Flowering Tobacco
Not only is this festive little plant supposed to smell heavenly, my husband is a cigar smoker and the thought of growing "tobacco" is pretty awesome for him. 

And to add some drama, we have these...
Celebrity Red Petunias
Normally, I am not such a big fan of petunias at all.  But we do have plans for a hummingbird garden and apparently those quick little birds just love petunias.  Especially, flashy, tacky, red one.

So there you have it- the plans for the window boxes.

Wednesday, February 23, 2011

How Does Your Garden Grow? Part 1

I have a confession to make.  I am a total and utter failure at growing vegetables.  Every spring, I have such high hopes for my vegetable garden.  And somehow, I always end up disappointed.  Take last year for instance.  I planted 8 tomato plants.  Guess how many homegrown tomatoes I enjoyed?  Zero.  Yes, that's right, not a single one.  Damn blossom end root.  And what about those big, beautiful, heavily flowering squash plants I lovingly tended last year?  Not a single one actually grew a squash.  In all fairness, that one has more to do with a lack of honeybees and pollination than failure on my part.  But still, utter disappointment.  So this year, I am taking a break from vegetable growing (luckily, we have lovely farmers markets, so we'll have access to lots of fresh produce) and embracing flowering growing!

We have several garden areas planned including the pergola, a hummingbird garden, a cutting garden and window baskets.  As to not over do, this post will focus on dressing up the pergola.

The pergola that Seth and I built last spring and were married under last September, will be hosting...
Key Lime Cup and Saucer Vine
Each leg of the pergola will also get a big pot that will hold...
White Angelonia Serena
And
Petunia Dolcissima Flambe
I just love that name.  It sounds so fancy!

But I just love the combination of cool green and flashy pink.  I am very excited about this!

What garden plans do you have for this summer?