Okay y'all, Thanksgiving is only a little more than 2 weeks away, which means its time to talk about food. I sure do love food. In order for this series of posts to make sense, I must clarify one big thing. Seth and I do Thanksgiving just the two of us. I absolutely adore my family and Seth's family, but there is just something so nice about it just being the two of us. We like to think that we are building the traditions that we will one day pass on to our kiddos. So with the sappy out of the day, onto the recipes.
I love to have some form of appetizer out. We usually put it out fairly early because we don't want to fill up too fast. This year, I have two options I am playing with.
First up, Pogaca. What the hell is Pogaca? Well, its fluffy cheese bread. I have never had it, but really come on, cheese+bread=hell yes. Seth also has really fond memories of this stuff from when his family was living in Hungary. If I don't do this for an appetizer, it will certainly make the rounds at dinner. The recipe is below.
Option two: Y'all are going to think I 've lost my marbles for good with this one, but I promise it is delicious. Brie with caramel sauce. I'll give you just a minute to pick your jaw up off the floor... Ready? Recovered? Seth and I had this combo a few weeks ago. The Fresh Market had little boxes of brie with caramel, so we gave it a go and man, it was so good! Seth and I ate this at room temperature, so I think the only thing I would do differently is heat it up a bit so the cheese gets all gooey. I promise, the recipe for this one goes like this: open wedge of brie, dump caramel on top. DONE-ZO!
Tune in later this week when I will tackle the healthier aspects of our meal (fruits and veggies), the carbs, the main dish (spoiler alert: it ain't turkey) and desert.
Pogaca
Ingredients
4 c. flour
1/4 c. warm milk
1 tbs. yeast
1/2 c. vegetable oil
1 tbs. sugar
1 tsp. salt
3/4 c. mineral water
half bunch of parsley
1 1/2 c. feta cheese
1 egg yolk
poppy seeds
Directions:
Mix sugar and yeast with the milk, let proof. Then combine all ingredients flour- mineral water (including the sugar/milk/yeast). Mix well. The dough should be pliable and not sticky. Add more water or flour if needed. Cover dough with a moist cloth and let it rest for 45 minutes.
Chop the parsley and mix it in with the cheese.
Pinch off a small piece of dough and flatten it with your hands. Dump a tsp of cheese into the break and fold upwards into a bundle. Place the pogaca's on a parchment lined tray, folded side down.
Preheat oven to 350
Beat the egg yoke and coat the pogacas. Sprinkle with poppy seeds.
Bake for 30 minutes or until golden.

Monday, November 7, 2011
Butternut Squash Hash
I love the fall. The break from the relentless summer heat and humidity, beautiful changing leaves and a serious change in food. I love fall foods- winter squash, sweet potatoes, pumpkin, orange food. Seeing that butternut squash was on sale at the Teeter, I got it into my head that I should try and make some butternut squash hash. My recipe is based on this one.
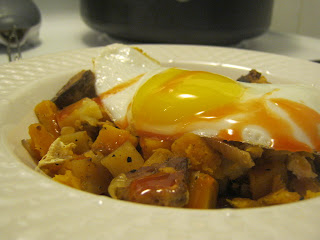 Butternut Squash Hash and Eggs
Ingredients
Veggie bacon
1/2 onion, diced
2 cloves garlic
1 butternut squash, peeled and diced
1 potato, diced
1/2 c. apple cider vinegar
1 tsp. (or more) of hot sauce
4 eggs
Method
Preheat oven to 400
Cook your bacon and set aside
Saute your onion and garlic. Add your squash and tater. Cook until the tater and squash begin to get soft. Add the vinegar and hot sauce. Cover and cook until everything is nice and soft. Add in your bacon.
Make four wells in your hash and crack eggs into them. Place in over and cook until whites are set.
Enjoy!
Wednesday, November 2, 2011
Cigar Box Shelves
Here's the thing, my husband loves cigars. He actually even writes a cigar blog. I would tell you to check him out, but the additional hits will just make his head swell... Anyways, loving cigars equates to lots of cigar crap in our home- lighters, bands, humidors, humidor crap and cigar boxes. Out of all that, I mind the boxes the least, because really cigar boxes aren't so bad and generally are the least tacky of all cigar items.
So thinking of cigar boxes, I got this little idea in my head. I could turn cigar boxes into floating shelves and that is exactly what I did.
First, I got Seth to get me seven boxes. If your husband doesn't have a million boxes lying around, just head to your local cigar store and I am sure they will hand over some boxes.
 I pried the tops of each both with a pair of pliers because I wouldn't need them. Since the boxes are unfinished, I wanted to give them a hint of something without taking away from the carved labels. I ended up mixing bronze paint with water in a 1 to 4 ratio. This ended up giving the boxes a bit of color and just a little sparkle when the light hits them, without over powering the boxes.
 Once the boxes were dry, all I had to do was hang them. I sunk two screws per box and that seems to be holding just fine.

 And then I added some adornments...

 LOVE!!!!
I swear, this project is just as easy as it sounds. All told, I think it maybe took an hour. Plus, I had the boxes, paint and screws, so this baby cost ZERO dollars. A free and easy project is certainly something I can get behind.
Anyone else do any easy and/or free projects lately?
So thinking of cigar boxes, I got this little idea in my head. I could turn cigar boxes into floating shelves and that is exactly what I did.
First, I got Seth to get me seven boxes. If your husband doesn't have a million boxes lying around, just head to your local cigar store and I am sure they will hand over some boxes.


I swear, this project is just as easy as it sounds. All told, I think it maybe took an hour. Plus, I had the boxes, paint and screws, so this baby cost ZERO dollars. A free and easy project is certainly something I can get behind.
Anyone else do any easy and/or free projects lately?
Monday, October 31, 2011
Lentil Veggie Soup
Sorry folks no pictures of this one. This is not a pretty dish. In fact, its down right ugly, but it sure is good. Feel free to omit or sub out any veggies that aren't to your taste. Really this is a versatile little soup.
Lentil and Veggie Soup
Ingredients
1 Tbs. Olive Oil
1 onion, chopped
3 cloves garlic
3 carrots, peeled and chopped
3 stalks of celery, chopped
4 c. veggie stock
1 1/2 c. lentils
1 small butternut squash, peeled and chopped
1 package frozen spinach
Methods
Heat oil and saute onions, garlic, carrots and celery until soft
Add lentils, broth and squash. If necessary, add water until all ingredients are covered. Bring to a boil and then reduce to a simmer.
Cook 20-30 minutes or until lentils and squash are tender. Add spinach. Season her up- really any way you like. I like a bit of spice so just some salt, pepper and red pepper flakes did the job.
Enjoy!
Thursday, October 20, 2011
Get Your Head (board) on Straight
So I've been hemming and hawing over what type of headboard to adorn the guest bedroom with. I had lots of ideas that I loved (lord knows, I pinned plenty...), but I just couldn't commit. UNTIL I found these babies at the habitat store...
 Those would be frames that you would use for replacement windows... At only a buck a piece, I snatched up 5 since I had no idea how many I would actually need to make the headboard with. Once I got home, I figured that 3 would be prefect for a full bed.
Step two involved spending a million hours at Jo-Ann fabrics hemming and hawing over which fabric to use. I finally settled on...
 A dark purple and two festive prints. I loved the colors and how they reflected much of the same palate as the Matisse prints also in the guest bedroom.
The rest of this process is very exact and precise. You must follow my every direction or you will fail.
Turn frame over, lay fabric over the frame, pull tight and staple gun the shit out of it.
 See easy... Just repeat for all the panels... I suggest drinking a bottle of wine and watching Modern Family while doing this.
 And then do the top parts the same way...

The next step was to figure out how to attach everything. After a lot of hemming and hawing at Lowe's (man this project involved WAY too much indecision), I grabbed a couple of 48" pieces of oak (dimensions 1/2"x2").
To attach the frames, I flipped em over, and attached the boards across the back...
 Finally, to hang 'em, I picked up a packet of picture hanging stuff that can handle a heavy load...
 I just attached the little eyelet guys at the ends of the boards...
 And ran the wire between them...
 And from there, it was just like handing a picture.
So how did it turn out?
 TA DA! LOVE IT...
And for a more vertical view...
 And a slightly wider angle (man this room is hard to take pictures of...)

Not bad for a couple hours and less than $30.00. Now I just have to figure out what to do the blank space all around the headboard...

Step two involved spending a million hours at Jo-Ann fabrics hemming and hawing over which fabric to use. I finally settled on...

The rest of this process is very exact and precise. You must follow my every direction or you will fail.
Turn frame over, lay fabric over the frame, pull tight and staple gun the shit out of it.


The next step was to figure out how to attach everything. After a lot of hemming and hawing at Lowe's (man this project involved WAY too much indecision), I grabbed a couple of 48" pieces of oak (dimensions 1/2"x2").
To attach the frames, I flipped em over, and attached the boards across the back...


So how did it turn out?

And for a more vertical view...


Not bad for a couple hours and less than $30.00. Now I just have to figure out what to do the blank space all around the headboard...
Friday, October 14, 2011
A Little Face Lift
NOT FOR ME!! For the sweet little thrift store table that lives next to our front door. Sadly, this sweet little table was never in great shape and 2 moves in 4 years has not helped it at all.
 Poor little thing...
Fortunately, the issues here are actually pretty minor. Let's break 'em down...
Problem 1: Chipped Paint
 It appears that the drawer area was originally stained before being painted over, but the legs had traces of pink and green paint on them. Maybe it was just built out of reclaimed wood... Regardless, a new coat of paint was badly needed.
Problem 2: Split Wood
 The little space between the two drawers was split at the bottom, making it really hard to open or close the drawers.
Problem 3: Nasty Glass
 Can you see how dirty that glass is? I am more than a little embarrassed about that. I mean really, cleaning glass ain't exactly rocket science...
To get this baby back in shape, I started by cleaning out the drawers. I unearthed homeopathic doggy downers (for Matilda) that were at least 2 years out of date, a bag of calorie replacements from when I used to run far (also about 2 years out of date), a car charger for a phone I no longer have and a blue mesh bag. What is wrong with me?
AND back to the table...
From here, a bit of wood glue and some clamping was all the was needed to fix the split wood issue.
 And two nice coats of paint...
 And new knobs for the drawers...
 And you got yourself a better looking table...
BUT I couldn't just stop there. This table is so sweet, it needed a little umph, so I stamped a couple fleur-de-leis on top...
 Side note about fleur-de-leis, Seth really likes 'em, probably because he lived in Europe for a while and is a closet snob. So when I showed them to him, he says "man, I really like fleur-de-leis." And I say, "yes, I know, that's why I did those." And he says "You actually listen when I talk? Maybe I should do that..." And there you have it...
So back to my sweet little table. Her she is in all her glory...
 And a little looksie from the top...
 Man, clean glass alone makes such a difference. I am even more in love with my little table now...
Anyone else have a quick little Saturday facelift project planned?

Fortunately, the issues here are actually pretty minor. Let's break 'em down...
Problem 1: Chipped Paint

Problem 2: Split Wood

Problem 3: Nasty Glass

To get this baby back in shape, I started by cleaning out the drawers. I unearthed homeopathic doggy downers (for Matilda) that were at least 2 years out of date, a bag of calorie replacements from when I used to run far (also about 2 years out of date), a car charger for a phone I no longer have and a blue mesh bag. What is wrong with me?
AND back to the table...
From here, a bit of wood glue and some clamping was all the was needed to fix the split wood issue.


BUT I couldn't just stop there. This table is so sweet, it needed a little umph, so I stamped a couple fleur-de-leis on top...

So back to my sweet little table. Her she is in all her glory...


Anyone else have a quick little Saturday facelift project planned?
Thursday, September 29, 2011
Still not the Yard of the Month
Time for some follow up... Last time we check in on the yard, I shared our scary blank canvas and a super sweet illustration of what will come. So how did we do?

 A bit better, eh?
I know these shots don't do a lot to highlight what happened, mostly because I like to buy baby plants and let them grow into bigger plants. Baby plants are less expensive and easier to plant since you don't have to dig a big ass hole.
So lets take another look at that sweet drawing I did...
 What you can see in the above pictures is that the hydrangea has been moved and we have added two more hydrangeas, we have planted four hostas, we have plated a ton of daylilies and 3 rose plants.
And a closer look at each area...
HOSTAS
 We got these beauties out at the Greensboro Shrub Nursery. I believe that are called "fancee." Luckily, they are fairly sun tolerant, so they should be able to handle the PM sun they will occasionally get hit with and these babies can get big. I love big hostas. We need to add more to fill out the area some more, but just these four make a pretty big difference.
HYDRANGEAS
 The one hydrangea we already had is the endless summer variety. Sadly, the Greensboro Shrub Nursery didn't have anymore endless summer's, so we picked out another blue/purple variety. We'll see how this all works out when they bloom.
DAYLILIES

I ordered our daylilies from Smokeys Daylily Gardens. We went with a mixed lot and was able to get 25 fans (or baby plants) for pretty cheap. I am really pleased with this purchase. The plants came fast and were in great shape. I can't wait to see them next spring when they are in bloom.
ROSES
I knew I wanted to plant roses in this area because they can tolerate the afternoon sun. After planting two knock out roses in the past, I was ready for something a little less easy care and a little more ROSE! After doing some research, I mostly settled on David Austen roses. These roses are know for their old rose charm (fantastic sent and beautiful shape), while still being disease resistant. All roses came from Chamblee's Rose Nursery. The roses arrived in excellent shape and best of all, they are potted, not bare root.
 The Winchester Cathedral rose is noted for its bushy appearance, old rose sent and double blooms.
 The Evelyn rose is named for Crabtree and Evelyn and mimics their awesome light rose sent. And I love their light yellowy, pinky soft color.
 This baby is actually the only non David Austen rose I purchased. Named "sea foam," it is an earth kind rose. Earth Kind roses have been cultivated to grow well in a variety of soil types, which reduces their need for soil amendments, fertilizers and pesticides. Also, they have been bred for drought tolerance once established. I am super excited to see how this one does.
And that wraps up our fall planting. Clearly we still have loads to do, such as adding a new layer of pine needles, keeping up with the wedding and filling in the empty areas some more. But at least for now, I don't feel like our poor yard is such a barren wasteland.
Anybody else tackling some fall planting?


I know these shots don't do a lot to highlight what happened, mostly because I like to buy baby plants and let them grow into bigger plants. Baby plants are less expensive and easier to plant since you don't have to dig a big ass hole.
So lets take another look at that sweet drawing I did...

And a closer look at each area...
HOSTAS

HYDRANGEAS

DAYLILIES

ROSES
I knew I wanted to plant roses in this area because they can tolerate the afternoon sun. After planting two knock out roses in the past, I was ready for something a little less easy care and a little more ROSE! After doing some research, I mostly settled on David Austen roses. These roses are know for their old rose charm (fantastic sent and beautiful shape), while still being disease resistant. All roses came from Chamblee's Rose Nursery. The roses arrived in excellent shape and best of all, they are potted, not bare root.


And that wraps up our fall planting. Clearly we still have loads to do, such as adding a new layer of pine needles, keeping up with the wedding and filling in the empty areas some more. But at least for now, I don't feel like our poor yard is such a barren wasteland.
Anybody else tackling some fall planting?
Thursday, September 22, 2011
Time to check in once again on the living room saga. Remember where we were?
 I started by taking down all of the existing prints (duh!) and quickly realized a little problem. You see when Seth and I painted this room, we were short sighted. We didn't consider that we would ever change anything, so we just painted over the picture hangy things. Which meant when I removed those do-dads, We had an ugly white blob.
 Whoops. And to make matters even more complicated, we didn't have any paint left over and we didn't write down the paint name. Home owner fail. So I made a quick trip to Lowes and grabbed every brown paint swatch I could find. Seth and I held them all up against the wall and found the one that look right. I think the name has to do with a seal. Who names this shit? So another trip back to Lowes and I was able to buy an itty bitty of the paint color.
 This is totally awesome. And as you have probably guessed, we have this no leftover paint/ don't know the name of the paint problem all over the house, so I plan to eventually get itty-bitties for all the rooms of our house.
Anyways, back to our saga, I dabbed some paint on the white spots and it dried perfect...
 See can't tell, unless you're looking for it. And if you are looking for it, please stop.
From here, the rest of the project was easy-breezy. I mean really, hanging a picture isn't rocket science. Without further ado, I give you the final product...
 LOVE! The scale is much better and the asymmetrical alignment looks much more grown up. Plus I love how the blocks in my art play off of the squares in the Kandinsky print and the colors are similar to those in the Klimt. I call this a major win.
I still have plenty left to do in this room, such as update the mantel arrangement...
 That will also include doing something about that ghastly fireplace surround.
And hang new curtains....
 The red just isn't working for me anymore.
And do something to make the bookshelf not look so cheap-o...
 I really like what John and Sherry did here. Now I just have to convince Seth....
And I have to make our upholstered coffee table not look so sad...
Stay tuned as the saga continues....
- Seth and I rearranged furniture to make the space more liveable
- I realized our decor was a little college-student-esque and made some cheap and easy art


Anyways, back to our saga, I dabbed some paint on the white spots and it dried perfect...

From here, the rest of the project was easy-breezy. I mean really, hanging a picture isn't rocket science. Without further ado, I give you the final product...

I still have plenty left to do in this room, such as update the mantel arrangement...

And hang new curtains....

And do something to make the bookshelf not look so cheap-o...

And I have to make our upholstered coffee table not look so sad...
No brilliant ideas here yet, but I'm sure I'll figure out something...
Stay tuned as the saga continues....
Tuesday, September 20, 2011
Not the Yard of the Month
Our cute little neighborhood association holds a yard of the month competition each month from April until October. Seth and I are in no danger of winning that award. I am slightly embarrassed to admit that our yard has only gotten worse since that post. Really, it's not so much my fault. This summer has been hotter than hell and dry. That did nothing to improve our yard. So that leaves us where we started, with a big blank scrubby looking yard...


 See? Well, really not see? There is nothing except leaves and a scant layer of pine needles. Sigh.
But don't disgrace- there is a vision...
 Okay, so clearly this is my house and yard. Stop laughing. I know you're just jealous of my mad paint skills.
So lets start with what we have. Starting left, Seth and I planted a whole bunch of lilies and glads, which are great, but they bloom for about 2 weeks and then dry up. Sad face. We then have 2 camellias, pretty evenly spaced in the yard. We also have a dogwood. We have a poor hydrangea planted on the other side of the dogwood. Baby gets too much harsh sun. In front of the hydrangea, we have some (8ish, 10ish) day lilies planted.
A quick note on why things are hard to grow in our yard. Our house is oriented towards the south. Which is a good thing, normally. However, our nice, old, established neighborhood is full of nice old, established, massive trees. These trees block the sun until about 3pm. And then our yard gets full on southern summer sun until dark. Just imagine staying in your nice cool air conditioned house and the running outside, naked with no protection and standing in the dead heat until dark. You ass would be fried and so are our plants.
So with that in mind, onto the planting plan... Starting on the right this time, we are going to move the hydrangea to a more protected space. We will then fill in that spot with some roses. Roses are actually pretty hardy and afternoon sun helps prevent certain types of mildew. In front of the roses, we will fill in with more day lilies. The hydrangea will move to the fence line between the two camellias. Two more hydrangeas will be added so that no one gets lonely. In front of the hydrangeas, we will fill in with hostas. I know this seems risky given our sun situation. But, hostas can be pretty sun tolerant and because a big branch from the oak tree hangs over this area, I think they should be a-okay. That brings us all the way to the left, which I haven't totally figured out yet. Right now I am thinking a mixture of coneflowers...
And just to keep you in suspense, I can reveal that Seth and I have spent the last 2 weekends planting. Check back early next week for the results.


But don't disgrace- there is a vision...
So lets start with what we have. Starting left, Seth and I planted a whole bunch of lilies and glads, which are great, but they bloom for about 2 weeks and then dry up. Sad face. We then have 2 camellias, pretty evenly spaced in the yard. We also have a dogwood. We have a poor hydrangea planted on the other side of the dogwood. Baby gets too much harsh sun. In front of the hydrangea, we have some (8ish, 10ish) day lilies planted.
A quick note on why things are hard to grow in our yard. Our house is oriented towards the south. Which is a good thing, normally. However, our nice, old, established neighborhood is full of nice old, established, massive trees. These trees block the sun until about 3pm. And then our yard gets full on southern summer sun until dark. Just imagine staying in your nice cool air conditioned house and the running outside, naked with no protection and standing in the dead heat until dark. You ass would be fried and so are our plants.
So with that in mind, onto the planting plan... Starting on the right this time, we are going to move the hydrangea to a more protected space. We will then fill in that spot with some roses. Roses are actually pretty hardy and afternoon sun helps prevent certain types of mildew. In front of the roses, we will fill in with more day lilies. The hydrangea will move to the fence line between the two camellias. Two more hydrangeas will be added so that no one gets lonely. In front of the hydrangeas, we will fill in with hostas. I know this seems risky given our sun situation. But, hostas can be pretty sun tolerant and because a big branch from the oak tree hangs over this area, I think they should be a-okay. That brings us all the way to the left, which I haven't totally figured out yet. Right now I am thinking a mixture of coneflowers...
And just to keep you in suspense, I can reveal that Seth and I have spent the last 2 weekends planting. Check back early next week for the results.
Subscribe to:
Posts (Atom)