Sorry for the short absence. Between the holidays and starting back to work, life has been a bit nutty. So much has changed since Ella's arrival and everything, from the smallest things (getting laundry done, going to the grocery store) to the biggest things (going out of town), requires a lot more planning. Seth and I realized that there is a lot we want to do, both as a couple (read: without Ella) and as a family (with Ella), but in order to do anything of those things, we need to focus on planning (I sure do love a good plan). So on New Years Day (and, yes, a New Years post is still fine since it is still January, right?), we sat down and outlined 13 fun things to do in 2013. So without further ado, I give you...
THE GEISE FAMILY 13 FOR 2013
1. Take Ella to the zoo
North Carolina has a pretty great zoo. I loved going there as a child and I can't wait to introduce Ella to all the animals. She is still on the young side for this one, so we'll be waiting until the Fall for this adventure.
2. Go to the beach
Seth and I love the beach and NC has some pretty awesome beaches. We are really looking forward to putting Ella in a silly little bathing suit and letting her explore the sand and sea.
3. Go to Asheville without Ella
Asheville has a very special place in our hearts. We have visited several times, including our mini moon following our wedding. Since we didn't really get to celebrate our anniversary this year (Ella was born 3 days after our anniversary, interrupting plans we had for a fancy dinner), we are really hoping to get away for a night.
4. Fancy Dinners: Valentine's Day, Anniversary, Seth's Birthday, Katie's Birthday
Greensboro has some pretty decent resturants and Seth and I always have a good time when we go out. We love spending time as a family, but also want to make sure we set aside time for us. Hence, we have already carved out 4 sure dates for dates.
5. Family Picnic
I love picnics and I think it will be so much fun to spread out a blanket, watch Ella roll around, and eat some tasties in the sun. This is one that we can do as soon as it gets warm out.
6. Chapel Hill day trip
We think it will be a lot of fun to just get away for a day and luckily Chapel Hill is only a quick drive away. We plan a tasty lunch, some times with friends, and a trip to the Trader Joes.
7. Take Ella to the Children's Museum
Greensboro has a pretty awesome Children's museum from what we hear. Apparently, they have a room for the little ones, so we'll be headed there once Ella is a bit more mobile.
8. Red Oak Brewery Tour
This is another one for just Seth and I. We have done a couple of winery visits and always had a blast, so it seems sensible to take a quick drive down the road to sample some really tasty beer.
9. Katie and Seth run a 5K
In the past, Seth and I have run a 5K together on Thanksgiving. Clearly, that didn't happen this year. So, we'll be picking out another race and lacing up our shoes. I am looking forward to a picture with Ella at the finish line.
10. Visit Dad and Denise
My dad and his wife own a really awesome piece of land up in Virginia. We had the pleasure of visiting them right before Christmas and are looking forward to heading back up once the weather warms up a bit.
11. Visit Seth's Brother
Seth's brother and his family live outside of DC. They have a daughter who is 11 months older than Ella. We have a great time when we are with them and can't wait for Ella to be old enough to play with her cousin.
12. Host a party
We have not done a great job of having people over to enjoy our house. After Ella was born it was a lot of fun to have people drop by. In the same vane, we are planning to host a party and we'll have plenty to celebrate.
13. Go to a hockey game
Being from Nothern New York, Seth grew up playing hockey. He loves the sport (and is pretty damn good at it). Last year, we headed to a Hurricane's game and it was so much fun. Now that the NHL strike is over we are looking forward to enjoying another game.
So those are our plans for 2013. They are posted on our fridge, so we don't forget. Having fun is a priority for us and I promise updates as we have these little adventures.
Anyone else planning anything fun for 2013?

Showing posts with label project. Show all posts
Showing posts with label project. Show all posts
Saturday, January 26, 2013

Tuesday, December 4, 2012
One Man's Trash...
Its no secret that I am perfectly willing to pick up things off the side of the road in hopes of restoring them in some fashion (I come by it naturally- my mom is the queen of finding roadside treasures). So when I was out running a summer ago (yes more than a year ago) and I found this beauty, I had to go back and get it...
 Yes, thats right- an old school chair, plastic seat and all. I placed this sweet little chair on the front porch with promises that I would make it pretty real soon. And that didn't happen. The chair ended up sitting there, unloved, for well over a year. Whoops.
But with the impending arrival of Seth's family for Thanksgiving, I finally found the motivation to make this lovely actually lovely.
 I started by taking the chair apart and sanding it well.
 I spray painted the frame oil rubbed bronze. The light fixture on the porch is ORB, so I figured a darker frame would go better.
 I spray painted the sets green.
 And put it all back together...


But with the impending arrival of Seth's family for Thanksgiving, I finally found the motivation to make this lovely actually lovely.


And placed it back in its home on the porch.
Like most projects I tackle, this was insanely easy and fast. It really is embarrassing that it took me so long to finally get this done, especially because it looks SO much better. I think the chair needs a plant or something sitting on it. Hopefully it wont take me more than a year to get on that...
Tuesday, November 13, 2012
Mirror, Mirror on the Wall
One of the many things I love about my husband is that he not only tolerates, but supports and encourages me to pick up things off the side of the road. Imagine my delight when he came home with this ugly ass mirror...

He pulled it our a garbage can. The things we do for love...
Other than the light oak colored laminate and fake marble pieces (see below for picture), this baby had some real potential. It is huge and has a nice shape to it. I hoped a little spray paint could fix her right up. But I was also knew there was the chance that no amount of spray paint could save this puppy. Since the mirror was free and spray paint is only $4 a can, I decided to go for it.


And then it was time to hang it. I forgot to take pictures of the mirror that was in this spot before, but don't worry it has a new home.

Anyone else redeem a piece with some spray paint?
Monday, October 22, 2012
Concrete Planters
How 'bout a post that has nothing to do with the baby? Well, maybe a little to do with the baby cause she was there (and very helpful).
We have jasmine growing up the sides of our pergola. It is a beautiful vine and it smells heavenly when it blooms. Simply, we love it. However, we do not love the planters we put it in. They are cheap, falling apart, allow no room for root growth and are simply ugly. Don't believe me? See for yourself...


Not so pretty... So we set off to make some easy, awesome looking planters out of those big, concrete stepping stones you can get at any hardware or landscaping store. We opted for the 16" squares because we wanted lots of room for the plants to grow. Plus we only made the four sided (no bottom), so the root system could eventually work its way into the ground.
To start, we purchased 16 squares (4 squares per planter times 4 planters) and some landscaping adhesive. Once we got then home, we positioned Ella to supervise (babies first project, yay!)...

And we laid out our steps...
 applied some adhesive...
 And added the next step...
 And the next...
 And the last one...
 And pretty soon, we had 4 planters all set...
 Two quick notes: this stuff sets up pretty fast, but we found it was helpful to hold the steps in place for just a minute to ensure that it was stable and the adhesive we got recommended allowing 5 days before the project was used, so these babies got a few days in the garage before they were installed.
And speaking of installation, my darling husband gets all the credit here. These suckers are crazy heavy and Ella decided she wanted to eat. So Seth got the planters into place, removed the old planters, added new dirt, and got the plants all settled in their new home (my husband is pretty awesome). And the results are fantastic...
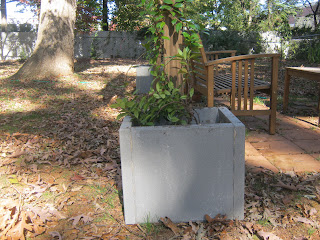 The planters look slightly industrial and really complement the pergola (rather than making it look cheap)...
 I am super excited about the new planters, especially because they are so large. I may be able to nestle in some annuals come spring time. Anyone else do some last minute fall gardening?
We have jasmine growing up the sides of our pergola. It is a beautiful vine and it smells heavenly when it blooms. Simply, we love it. However, we do not love the planters we put it in. They are cheap, falling apart, allow no room for root growth and are simply ugly. Don't believe me? See for yourself...


Not so pretty... So we set off to make some easy, awesome looking planters out of those big, concrete stepping stones you can get at any hardware or landscaping store. We opted for the 16" squares because we wanted lots of room for the plants to grow. Plus we only made the four sided (no bottom), so the root system could eventually work its way into the ground.
To start, we purchased 16 squares (4 squares per planter times 4 planters) and some landscaping adhesive. Once we got then home, we positioned Ella to supervise (babies first project, yay!)...

And we laid out our steps...


And speaking of installation, my darling husband gets all the credit here. These suckers are crazy heavy and Ella decided she wanted to eat. So Seth got the planters into place, removed the old planters, added new dirt, and got the plants all settled in their new home (my husband is pretty awesome). And the results are fantastic...


Friday, October 5, 2012
The Nursery!!
First, and most importantly, little bit made her appearance last week, Friday, September 28, a whole 2 weeks early! Seth and I were totally shocked when my water broke, but really she has been full of surprises from start to finish, so that was a fitting way for her to come into the world. I am working om her birth story and will also have a full report on how we have all settled in (canine and feline children included). So for now, just a quick picture of her all dressed and ready to leave the hospital.

And now, as promised many times, the NURSERY! Fortunately, I had it pretty much done when I went into labor. However, I am thankful to my mama who went by and hung up a few things for me and organized some diapers. If she hadn't done that, I can promise that the nursery would still be a mess. So without further ado...

 This is the view looking back towards the hallway. You can see the animal art I made, as well as her shelf. The shelf has been attached to the wall with L-brackets so that there is no was it can fall over on her once she in mobile
 Another view of the left side of the room. In this one, you can see the fun lamp we got her.
 The view of the right side of the room, including her crib, shelves, and some other artwork.
And for two close ups of some details...
 The mobile I made for her...
 And the animal art...
Even though her room is really only used for diaper changes and storing all her stuff (she sleeps in a pack and play with a bassinet in our room), I am totally thrilled with the room. I feel like it is feminine enough for a girl without being girlie. Its a fun room that should last her until she transitions into a big girl room (which would happen when baby 2 gets here, which will be a few years).


This is the view from the hallway. You can see the curtains mom helped me make, the glider I recovered, and the sweet blanket Ella's Great Aunt Missy knit for her.


And for two close ups of some details...


Even though her room is really only used for diaper changes and storing all her stuff (she sleeps in a pack and play with a bassinet in our room), I am totally thrilled with the room. I feel like it is feminine enough for a girl without being girlie. Its a fun room that should last her until she transitions into a big girl room (which would happen when baby 2 gets here, which will be a few years).
Friday, August 31, 2012
A Really Long Post about Recovering a Glider!
Before we get started with this post, let me make a few things very clear:
 You can't really tell in the photo, but the fabric is a nice light blue and white stripe. Want a close up?
 Not bad, just not what we are going for...
So to get started, first I panicked and then I pinned (as in, consulted Pinterest). I found two great tutorials (this one and this one) and decided to mix those methods for my plan of attack.
Step 1: Rip some seams
I used my seam ripper to pull apart the top backy piece and the bottom piece. This left me with the inserts for the back and bottom and pieces that I could use as a pattern.
For the back piece, you'll notice that part of it has some extra cushioning. I left this part on and planned to use it.
Step 2: Make a Pattern
For this project, we wanted some nice soft, baby friendly fabric. Although, it is not upholstery fabric, I picked up some black minky dot fabric from Hobby Lobby (love their sales!). I got 3 1/4 yards and had a lot left over. I think 2 1/2 yards would have worked. So, back to work... I laid my old pieces out and pinned them to my new fabric and cut (generously) around them.

 Step 3: Keeping the seams
This step can also we called: here's where it starts to get complicated... but not really. So, if you look at the original glider, you'll see all these nice seams on the back piece. Since I planned to use the fluffy back piece (like in this tutorial), I figured I should add the seams. I found out the hard way (I snapped a needle) that the best way to do this is to use a heavy duty needle and just gently follow the seam lines that are already laid out.
Step 4: Putting it all together
So now I have one backy piece attached to a fluffy piece and I need to attach the other backy piece, essentially making a giant, oddly shaped pillow case. I pinned my pieces wrong side in and realized something amazing- since my fluffy piece was part of the original piece, I could see exactly where the original was sewn. This allowed me to use this old seam as a guide and meant that I was exactly reproducing the original.
And once those were put together, I just had to flip the whole thing right side out...
Step 5: The bottom
The bottom piece was very much like the top, except there was no fluffy piece. Since following the existing seam worked so well, I decided to try that again. Basically, I flopped my fabric together wrong side in and pinned my patterny piece on top.
 All I had to do from there was follow the seam again and flip it right side out. OH and an important note that I may not have made clear yet- on both the backy piece and the bottom piece, I only sewed 3 sides (making an oddly shaped pillow case essentially). One of the things that I didn't like about the original chair was that the covers couldn't be removed for washing. I wanted to make sure that my covers could come off because 1) I'm a spaz and I spill things 2) there is a solid chance that a cat (or maybe even dog) will try and sleep on this thing and 3) babies are messy. So at this point, both my backy piece and bottom piece have an open, unfinished edge.
Step 6: The Side Pieces
These were possibly the hardest thing to figure out about this whole project. This is where I started following this tutorial. I didn't want to take these pieces apart because I wanted to be able to use the snaps that were already in place. I started by roughly tracing these guys on the wrong side of my fabric.

 Then I cut my pieces out, pinned them together, and sewed the following my chalk line. The result was very little oddly shaped pillow cases (closed on three sides and open on one).
Step 7: Finishing the Edges and Closing her Up
Since all of my pieces has an unfinished edge, I clearly needed to do something about that. I carefully folded the edge under and zipped in a quick hem.

Pretty easy and fancy looking! To close my pieces, I figured I would just use velcro...
 Of course, I bought black velco so you can't really see it, but I promise, its there. But really, it didn't need to be. The velcro didn't stick very well and when I put everything together I realized that you couldn't even see the bottom of the pieces. So I ripped the velcro off and my bottoms are hanging open (don't tell).
Step 8: Those stupid little side pieces...
Okay, so my side pieces are tricky- they are attached to the chair by snaps at the top and the bottom. Since the bottom was open, it was easy to snap those babies in. Following my tutorial, I cut slits in the already sewn top part to expose the snaps.
Now, friends, here is where I went wrong. I cut my holes and then tried to install the damn thing, only to find that my holes were way off. Here is what I recommend... cut a hole for your middle snap, snap it to the top part of the chair. From there, figure out where you need to cut for your left snap and then cut that hole. Repeat for the right snap. I ended up having to cut some HUGE holes in order to get everything snapped in. You can't see them, but I know they are there and they bother me.
Step 9: Secure the back...
Since the back is so tall, it has to be secured or it will flop over. To do this, I put the back in the chair and marked where I wanted to secure it.
 Then all I did was stitch on some long, skinny pieces that could tie around the bars of the chair...
 Step 10: DONE!
 I am insanely proud of this project. It looks surprisingly good, especially when you consider that I can't really sew. Just for fun, lets look at the start and the end together...
YAY!
But seriously, kudos to anyone who can follow this convoluted tutorial. More than anything, I hope this inspires y'all to tackle projects that are way out of your league (because sometimes they turn out okay). Anyone else insanely proud of a project?
- This post is going to be very long and have way too many pictures.
- While this is supposed to be a tutorial, it probably won't make very much sense at all.
- Really, I have no sewing skills. If I can do it, you can do it.


So to get started, first I panicked and then I pinned (as in, consulted Pinterest). I found two great tutorials (this one and this one) and decided to mix those methods for my plan of attack.
Step 1: Rip some seams
I used my seam ripper to pull apart the top backy piece and the bottom piece. This left me with the inserts for the back and bottom and pieces that I could use as a pattern.
 |
| BEFORE |
 | |
| After |
Step 2: Make a Pattern
For this project, we wanted some nice soft, baby friendly fabric. Although, it is not upholstery fabric, I picked up some black minky dot fabric from Hobby Lobby (love their sales!). I got 3 1/4 yards and had a lot left over. I think 2 1/2 yards would have worked. So, back to work... I laid my old pieces out and pinned them to my new fabric and cut (generously) around them.


This step can also we called: here's where it starts to get complicated... but not really. So, if you look at the original glider, you'll see all these nice seams on the back piece. Since I planned to use the fluffy back piece (like in this tutorial), I figured I should add the seams. I found out the hard way (I snapped a needle) that the best way to do this is to use a heavy duty needle and just gently follow the seam lines that are already laid out.
 |
| So (sew?), this is the fluffy back piece pinned to my fabric. I essentially just sewed into these lines to secure the fluffy piece to my new fabric. |
 |
| I know its hard to see, but the lines are there! Success! |
So now I have one backy piece attached to a fluffy piece and I need to attach the other backy piece, essentially making a giant, oddly shaped pillow case. I pinned my pieces wrong side in and realized something amazing- since my fluffy piece was part of the original piece, I could see exactly where the original was sewn. This allowed me to use this old seam as a guide and meant that I was exactly reproducing the original.
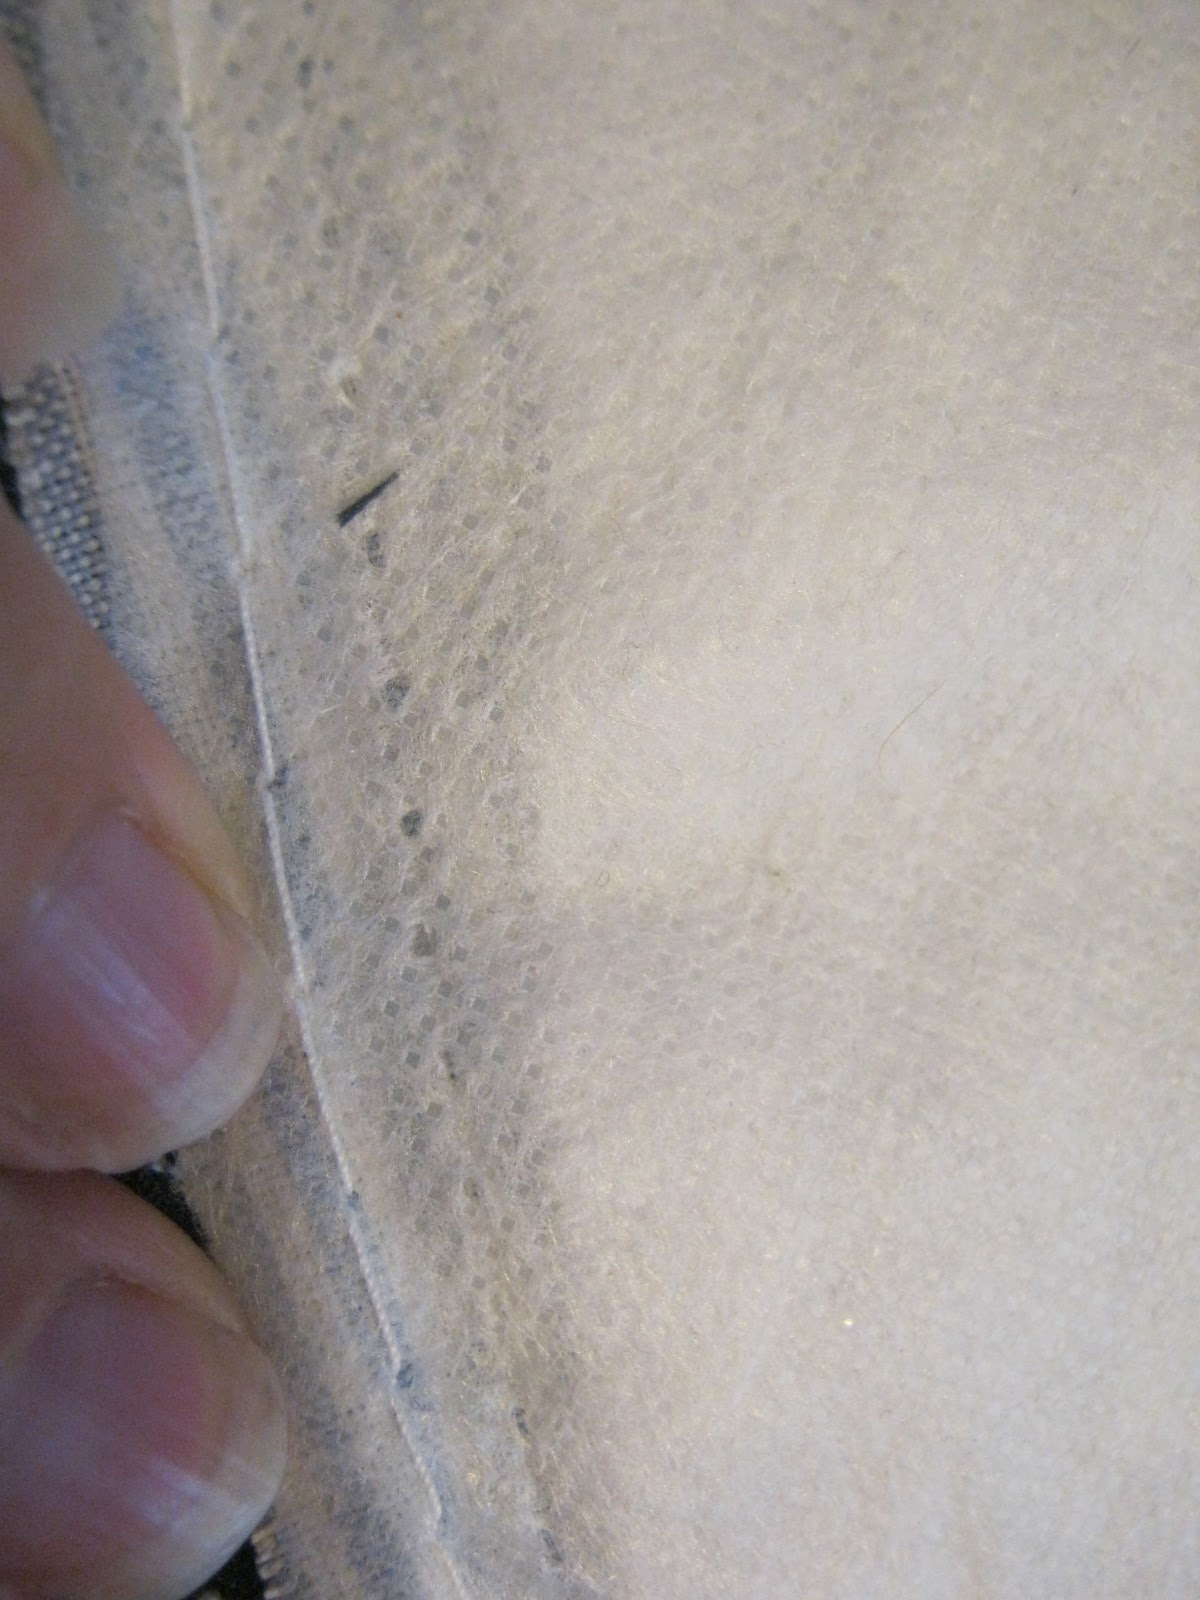 | ||||
| See- all I had to was follow the seam... |
And once those were put together, I just had to flip the whole thing right side out...
 | ||||
| Not bad for someone who can't sew! |
Step 5: The bottom
The bottom piece was very much like the top, except there was no fluffy piece. Since following the existing seam worked so well, I decided to try that again. Basically, I flopped my fabric together wrong side in and pinned my patterny piece on top.

Step 6: The Side Pieces
These were possibly the hardest thing to figure out about this whole project. This is where I started following this tutorial. I didn't want to take these pieces apart because I wanted to be able to use the snaps that were already in place. I started by roughly tracing these guys on the wrong side of my fabric.


Step 7: Finishing the Edges and Closing her Up
Since all of my pieces has an unfinished edge, I clearly needed to do something about that. I carefully folded the edge under and zipped in a quick hem.

Pretty easy and fancy looking! To close my pieces, I figured I would just use velcro...

Step 8: Those stupid little side pieces...
Okay, so my side pieces are tricky- they are attached to the chair by snaps at the top and the bottom. Since the bottom was open, it was easy to snap those babies in. Following my tutorial, I cut slits in the already sewn top part to expose the snaps.
 | ||
| If you look closely, you can see the snap |
Step 9: Secure the back...
Since the back is so tall, it has to be secured or it will flop over. To do this, I put the back in the chair and marked where I wanted to secure it.


|
| Before |
|
| After |
But seriously, kudos to anyone who can follow this convoluted tutorial. More than anything, I hope this inspires y'all to tackle projects that are way out of your league (because sometimes they turn out okay). Anyone else insanely proud of a project?
Subscribe to:
Posts (Atom)