Showing posts with label kitchen. Show all posts

Wednesday, January 4, 2012

What I did for Christmas Break (Part 2)

Alternately, this post could be titled: how to fix a hole in the wall after you slam a hammer through it...  When we left off, the new shelves were in and had been painted pretty clean white.  All that stood between me and pantry nirvana were a few pesky hammer holes...
Patching a wall is really very easy, provided that you buy the right materials.  To start grab some patches, a bit of drywall mud, a spreader for the mud and something to sand it with.
These are your patches.  They work like big band-aids.  All you have to do is peel the back off and stick it on and your good to go.
See, easy peasy.  Next, spread your mud, completely covering your band aid.  Make sure to apply nice smooth coats to reduce sanding later.  Also feather your edges to make for a nice transition.
I like to get the stuff that goes on pink and turns white once dry.  Its nice to know when its safe to work with, plus I love the thought of big, burly construction type men playing with pink mud.

Once the mud is dry, all you have to do is sand it down nice and smooth.  For this, I recommend a sanding sponge.  The sponge is a sponge on one side but has a coarse side for actual sanding.  Because the sponge is slightly damp, it captures the dust, preventing a HUGE clean up later.

Sadly, I have no pictures of this part.  But once I got everything nice and smooth, all I had to do was slap up a couple of coats of paint.  Luckily the former owners left a ton of paint, so I already had the original paint color.

Once the paint was dry, I installed my new pot rack, moved the microwave cart, restocked the shelves and had Seth change out the light fixture.  Without further ado, here she is...

The new and improved straight on view.  Notice how organized everything is (hell, the kitty box scooper is even hanging).  Also, please note the lovely hangy light Seth installed for me.  So much nicer.
The view to the right.  Nice and neat and yes, we have a LOT of booze.  But notice how nothing looks like it is about to topple to its death.
And the view to the left.  Nice, white wall with no awful cabinet.  The new microwave is on its way and should be here by the end of the week.  I made sure to hang the pot rack high enough so that the microwave would still fit.

And one last glamor shot with the light on.  SO IN LOVE!

But I know what you all are thinking to yourselves, she isn't just going to leave it white, is she?  The answer is no!  I have big plans to add a bit of fun to the function in this tiny room.  Check back soon(ish) for the next installment of pantry maddness.

Monday, January 2, 2012

What I did for Christmas Break (Part 1)

So, I pulled a disappearing act on y'all again... SORRY!  But I am here, once again, to try and redeem myself with the awesome tale of my Christmas Pantry Project (do you have an idea how many times I have typed PANTY instead of PANTRY?!).

When we first moved in, one of my very most favorite parts of our house was the walk in pantry.  It seemed like so much awesome storage space.  Notice the use of the past tense.  So here's what happened...  1)We accumulated 2 1/2 years worth of crap in the pantry 2) Our microwave caught on fire(!), which caused me to pay attention to the pantry a bit more.  So lets see what she was looking like as of first thing December 26...
This was the straight on view, that is what you can see from the kitchen.  So much crap, literally, check out the placement of the litter box.
 This is the view to the right, total and complete chaos.
And the view to the left.  Check out the oddly placed cabinet.  I swear, I have smacked my head on there a billion times.  Sucker has to go.
And a quick shot of the upper most shelf, just to truly round out the horror.  Note how everything looks like it may fall any moment.

The first stage of the plan was two fold:
1) Tear down the crazy cabinet.  This will allow me to move the microwave to that wall.  Add a pot rack over the  microwave for over flow pots.
2) Once the cart is moved, add 3 more shelves to add more more storage space and more organization.

So back to December 26.  I started by going to Lowes to get the lumber I would need to build the shelves.  The biggest flaw with this is my confidence that I knew exactly what I needed.  See, it happens that no matter how well I think a project through, I almost always end up having to go back to Lowes to get something else.  When relating projects back to my dad, I do so in terms of how many trips to Lowes I had to take ("You'd be so proud of me, I only had to take 6 trips to Lowes!")  Luckily, Lowes is right around the corner, so this is really no big deal other than the frustration factor.

With shopping completed, I figured my first logical step was to take down the cabinet.  I read enough Young House Love to assume that all I would need to do was unscrew a couple screws and gently lower the cabinet to the ground.  I even said to Seth "Hey, I bet we could put this in the garage..."  So imagine my surprise when there were no screws holding the damn thing up.  All I could see were 4 nails that were angled in a way that made them impossible to remove.  So I did the only logical thing and demoed that POS to death.  Sadly, the walls in that section of the house were in not such great shape and everytime I tried to pry the cabinet, I ended up putting my hammer through the wall...

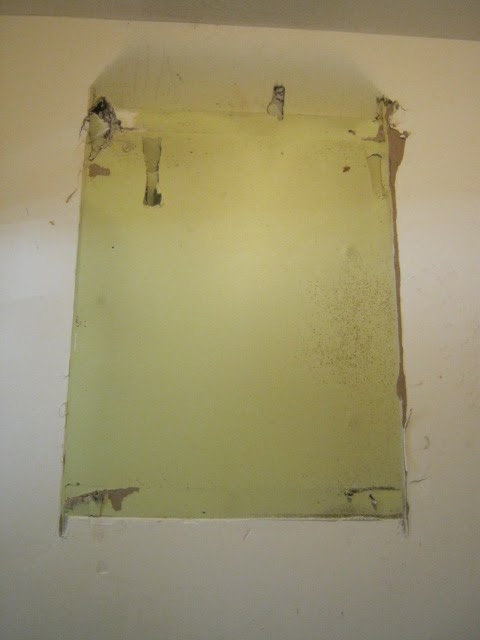
Womp, womp.  Cue trip two to Lowes for hole fixing supplies.  I am happy to report that this was the last trip to Lowes for this project ("A magical two tripper, Dad!"). Please do note the festive avocado green walls that were uncovered.

So with demo completed, I turned to shelf installation.  I wanted the new shelves to match the old ones, which required running 1x2's and then setting the 1x12s on top to create a shelf.

To start this, I lined my new 1x 2 up with the existing piece of wood.  I made sure that they were nice and flush and tacked it in with a screw.
Then, I leveled the piece of wood and tacked in another screw at the other end.  This made a nice level ledge for the 1x12 to sit on.  
I added more screws to ensure that everything would hold well.  I did my best to hit studs.  If you don't have a stud finder and arent good at the knocking of the wall thing, you can use an outlet to figure out where studs are.  Basically, you know that a stud in on either side of an outlet.  Once you figure out which side, you can measure out 16 inches and generally hit a stud each time.

Once my supports were up, I just had to measure and slap my 1x12s into place.  I started at the bottom so that I would have plenty of room work.
I secured the 1x12 to the 1x2 along the edges with screws.
For added stability at the corners, I toe screwed the new 1x12 to the existing 1x12.
All done and ready to be painted.  Luckily, Seth made an appearance at the point and helped me paint the new shelves quickly.

Lets leave this already too long post there for now.  I promise I'll be back with full instructions on patching dry wall and exciting after pictures.

Monday, May 2, 2011

House Tour

I got really excited and was all ready to write a to-do list kind of post.  You know all the millions of things we still want to do to our humble abode and then it occurred to me that I may be getting a little ahead of myself.  So lets back up a step and take us a tour...

When you first enter the house, this is what you see...
This is important because to understand the layout of our house, you have to use this point as the central point.  I will work around this center point, moving to the left as we go.

So first up, the kitchen...


I LOVE LOVE LOVE this kitchen.  When we started, there was no island and it was very sad, so this became one of our very first projects.  My uncle was kind enough to supply us with that beautiful granite.  A light change and a couple coats of paint later and there you have it.  A wonderful, sunny kitchen.  And it has a pantry-
The pantry tends to be a bit messy and unorganized...  It also important to note that the other door into the house is in the kitchen.  Luckily this one is outside of the fenced in area, so you can get in without tripping over the dogs...  And yes, you read that right, we have two front doors and no back or side doors.  Just one of the fun things about living in a 60 year old house that's had at least 3 separate renovations done...

So, as we head out of the kitchen and head to the left, we come to the guest bathroom...

Small and Bright, eh?  This bathroom is still very much a work in progress.  We have grand plans to replace all the tile and bathtub, because this is what we are dealing with...
Blue tile and a really uncomfortable tub, so sad and ugly.  But we have replaced the light, added storage and put a little curtain around the sink.  It mean really, no one wants to see exposed piping...

So heading to the left again, and we get the guest bedroom...


In all honesty, other than painting and adding all those sweet Matisee prints, we haven't done anything to this room.   And luckily it doesn't need much.

So that completes the left wing of the house, back to center...


Our big blue living room.  This room is pretty awkward, but it was worse when we moved in.  See that back wall with the floating shelves?  That didn't use to be there.  And you see the spot where the purple chair is sitting?  There use to be weird columns there.  I wish I has some before pictures, but trust me when I tell you it was well worth the money we spent to drop that wall in and pull the columns out.  Quick PSA:  The columns were in place for a reason- they are load barring, as is the wall we popped in.  In order to do this without bringing down your house, you need to install a header in the attic to support the ceiling.  This isn't so hard to do, but it could have some nasty, bad side effects if done incorrectly.  I strongly recommend using a professional for this type of work...

So onwards we go...  Behind that beautiful wall, we have a hallway...
Which is brillant, cause before you could see directly into that bedroom to the left... 

And that brings us to the "man room."

I would like to say that I hate the concept of a man room, lets be honest, I don't have a lady room anywhere.  And before anyone says "well the whole house is a lady's domain" be aware that Seth has been involved with every single decision that has been made in regards to our house.  His opinion, likes and dislikes are just as important as mine and we have worked hard to create a space that we are both happy with.  Rant aside, this is also the place where all of Seth's cigars, legos, model tanks and other odd things live.  He is happy with this space and I rarely go in here.

Back to the hall way and you can see our itty bitty laundry area...
Thank God for stackables...

And turn around and you're in the master bedroom...


We tried to keep this room pretty serene and it really does feel that way...  Or maybe that's just because I like to sleep...

To the left of the bed, we have Seth's closet...
And to the left of Seth's closet, we have the master bathroom...

Side note:  I have too many products...

And for a final bit of the tour, we head all the way back into the main room to find the TV room...

This is by far the room that we spend the most amount of time in.  Ava has a cat perch in here, Tilly likes the brown chair and Oliver likes to snuggle between Seth and I on the couch.  When picking the colors for this room, we wanted to highlight the fireplace and create an nice cozy feel.  Missions accomplished. 

So, as you can see, the whole house is painted and furnished.  That was a major task.  Most of the big projects have been tackled, but we still have a number of items on our to-do list. 

Where are you on making your house a home?

Wednesday, February 16, 2011

Wood Palette Project

This is another one of those easy projects that I just love!  The original idea came from some design magazine I picked up at Lowe's years ago (you know, one of those 100 design ideas under $100).

How to create this lovely display-

Start by finding yourself a wood palette.  This may seem tricky, but once you start looking, you'll see them everywhere.  If you know anyone in the construction, plumbing, heating and air, etc business, check with them.  Chances are good they have wood palettes lying all over the place.  If that doesn't work, try sweet talking your favorite home improvement store employee.  Really, these things are EVERYWHERE!

To hang your palette, start with good quality hooks.  Most hooks will tell you how much weight they will support, and I vote go high cause theses bad boys are heavy.  Also, make sure to follow the directions on attaching and hanging your hooks. 

When you actually hang the palette, the top of the palette (the solid wood part) should be hung against the wall with the bottom of the palette sticking out.  This will give you these nice little display shelves.  And you're done.  It's just that easy.

I do recommend popping some nails in if you plan on displaying breakables like plates (don't want them slipping and breaking).  There are tons of things you could display here, so don't feel limited.

Happy decorating!